The dough is sticky and tacky and will not hold a shape for a long time. The bulk fermentation can go horribly wrong as a result while the proofing will yield an intermediate dough that will eventually hold its shape. This is a recipe for an adventurer who is not scared of taking risks.
What a mouthful! Not only is the name quite a list of healthy ingredients but the finished product is to die for. My wife recently asked for a bread that would deliver more fibre in order to offset the growing presence of bread in our lives. What more could we ask than replacing 40% of the white bread flour with Rye and another 40% with nutty whole wheat, while adding a ridiculous amount of seeds to pack in a punch? Why only 40%? Because I did not think of preparing the starter with whole-wheat flour, which would have made this a 60% whole-wheat – 40% Rye bread. But, there is always next time!
While the bread is certainly healthier than a regular sourdough loaf, one should always remember that rye does contain a particular form of gluten, the protein secalin. However, as long as you are not gluten sensitive, this loaf is bound to delight you. This particular form of gluten, coupled with the amount of gluten makes this dough particularly harder to handle, especially if one opts for a much higher hydration level. If this is your aim, I suggest using a 3-step proofing process to ensure that the final shaping is possible.
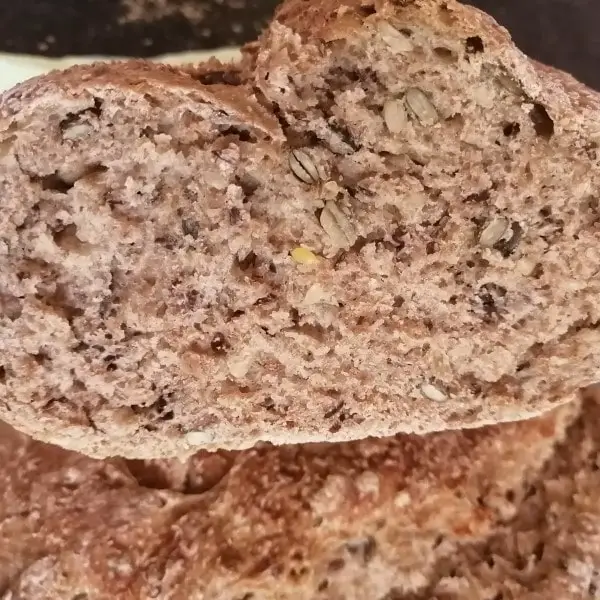
Rye flour is denser or heavier than white flour and usually loaves made with this flour will be denser and the loaf will feel heavier. The addition of nutty whole wheat flour also allows for a higher hydration level, making the finished product much more airy and lighter, giving the appearance of an almost normal bread.
Using sourdough starter instead of yeast also adds a wonderful flavour layer, especially if you opt for a long, fridge based proofing stage, which controls the amount of lactic acid being generated. This yields a subtle nutty profile with a touch of sourness that is barely there. A proper canvas which brings the flours and seeds alive.
Finally, the seeds added in create interest. Flax seed have a particular nutty flavour which works well with sourdough while the sunflower and pumpkin seeds are large enough that you get a satisfying crunch while chewing through them.
Pumpkin, Sunflower and Flax Seed Whole-wheat and Rye Sourdough Bread
2
loaves36
hours1
hour250
kcal37
hoursRich in fibre and nutritious without loosing the two best qualities of sourdough bread – nuttiness and a very light crumb that it ideal to be enjoyed warm with some lightly melted butter, this bread is the simplest to make. This recipe works particularly well with a soup such as caldo verde due to the rustic look of the finished product, however reshaping the bread into rolls make for some amazing packed lunches.
The recipe is very forgiving and can be modified to work around your schedule. The choice of seeds is highly personal and can be varied to reflect seasonality or some more robust dried fruits such as cranberries could be incorporated.
Ingredients
- Levain
250g (1 cup) bread flour (whole wheat or white)
250mL (1 cup) filtered water
1 portion of sourdough starter
- Bread
375g Rye flour
375g whole wheat flour
15g salt
400-500mL filtered water
100g pumpkin seeds
100g sunflower seeds
100g flax seeds
Directions
- Levain
- Take 250g of flour, 250mL of water and the sourdough starter and mix in a bowl – I use a knife to cut the ingredients together. This should give you a fairly smooth batter-like mix which will become more liquid as it evolves.
- Set aside to ferment for about 4 hours
- Bread
- Once the levain has been going for about 2 hours, mix the rye flour, whole wheat flour, salt and 400mL of water together in a large bowl. The right bowl can hold at least 2.5x the amount of ingredients here.
I use a knife for this step as it just needs to be a rough mix. It will look a bit dry, but that is ok.
If you can see flour at the bottom of the bowl, add a splash of water at a time until it is all picked up and the mix looks like wet sand. Cover with a tea-towel and set aside for 1 – 2 hours. - Bulk Fermentation
- Once the levain is ready, mix it into the flour bowl. I use a knife for this and use a folding action. The resulting mix does not have to be 100% perfect and you might still have a few dryish lumps in it like tiny pebbles. That is fine at this stage. Cover with a tea-towel and leave to rise for about 1 hour.
- Take the dough out onto a clean work surface and slap-stretch it a few times. Make sure that your hands and tools are wet as this is a very sticky mix. The water on your hands and tools will help prevent any sticking but do not panic if your hands get coated with the dough – it happens. Place back in the bowl for another hour.
- Repeat step 7 about 4 times to enable enough air to be incorporated and to ensure that any lumps are gone and set aside for a last hour.
- With your 5th set of stretching, it is now time to add in the seeds. I would add 1/3 of the seeds at a time and fold the dough over these, adding the rest in successive stretch-folds to ensure that the seeds are properly distributed throughout the dough.
- Cold Bulk Fermentation:
- Grease two proofing containers and place half of the dough in each dish. Do not worry about the shape of the dough at this stage as it should still be very soggy and hard to work with.
- Cover the dishes with clingwrap and set in the fridge of about 12 hours – overnight works well.
- Final Shaping:
- Take the dough out of the fridge and do a finger-poke test (wet your finger!). The indentation should rise incredibly slowly. The next steps work well with the dough when it is still cold and slightly stiffer.
- Tip the bread out onto a lightly floured surface. This will help at this stage to give the yeast a bit more starch to work with and stretch out to a large oblong shape. Fold it up into 3 folds, rolling the last seam on the counter to seal it.
- Stretch out the resulting sausage again, this time along the length of the sausage and flare out the last bit to give you 2 “ears”. Fold the dough again, this time in 4-5 segments going towards the “ears”. Tuck the ears over to seal the edges of the dough and place into a greased cooking tin / tray.
- Score deeply (3cm or 1 inch) and leave to rest for about 1 hour.
- Baking:
- Place a tray / pan / bowl on a rack at the bottom of the oven and pre-heat the oven to 230C. Do not use the fan setting on your oven!
- Fill the tray / pan / bowl with some boiling water to create steam and place your bread in the middle of the oven and bake for about 10 minutes at this setting.
- Turn the heat down to 200C and bake for a further 30 minutes.
- Turn on the fan in the oven and bake for a further 10-20 minutes until the bread sounds hollow when you tap it on the bottom.
- Allow to cool on a wire-rack and enjoy!