
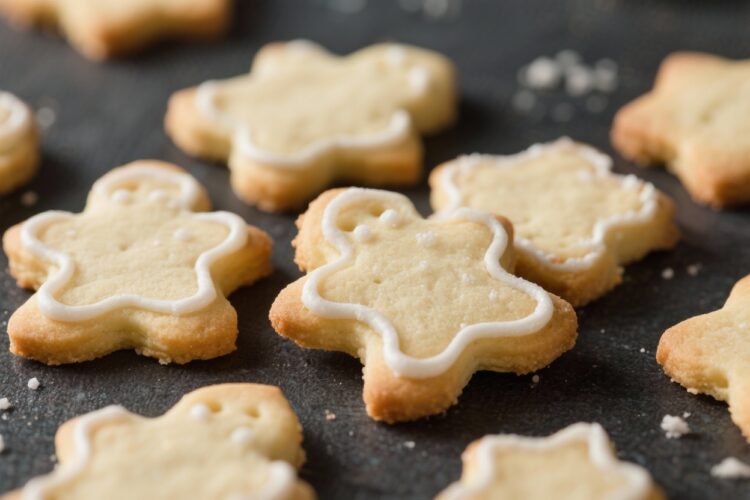
These cut out sugar cookies are the kind you remember from childhood—soft in the center, lightly crisp at the edges, and made for sprinkles and icing. The dough is easy to roll, holds its shape well, and bakes into clean, defined cookies every time. You can make them for holidays, birthdays, or just a cozy weekend baking session.
The best part? The dough handles like a dream and doesn’t puff or spread too much. Whether you’re a beginner or a seasoned baker, this recipe keeps things simple and reliable.
What Makes This Recipe So Good
- No-spread dough: The cookies bake with clean edges, so your stars look like stars and your hearts look like hearts.
- Perfect texture: Tender, slightly crisp, and not overly sweet, so they pair beautifully with icing.
- Easy to roll: The dough is sturdy but still soft, reducing cracks and frustration.
- Make-ahead friendly: The dough chills well and can be frozen for future baking.
- Kid-friendly: Simple ingredients and a forgiving process.
Great for cookie decorating days.
Shopping List
- All-purpose flour – for structure
- Granulated sugar – sweetness and crisp edges
- Unsalted butter – room temperature
- Large eggs
- Vanilla extract
- Almond extract (optional but recommended)
- Baking powder
- Fine sea salt
- Milk or cream (optional, for adjusting dough texture)
- Powdered sugar (for icing)
- Light corn syrup or honey (optional, for shiny icing)
- Food coloring and sprinkles (optional)
How to Make It
- Cream the butter and sugar: In a large bowl, beat 1 cup unsalted butter with 1 cup granulated sugar until light and fluffy, about 2–3 minutes. This traps air for a tender cookie.
- Add eggs and extracts: Beat in 1 large egg, then add 1.5 teaspoons vanilla extract and 1/2 teaspoon almond extract. Mix until smooth.
Scrape the bowl.
- Combine dry ingredients: In a separate bowl, whisk 3 cups all-purpose flour with 1.5 teaspoons baking powder and 1/2 teaspoon fine salt.
- Bring the dough together: Add the dry ingredients to the butter mixture in two additions. Mix on low until just combined. If crumbly, add 1–2 teaspoons milk to help it come together.
Do not overmix.
- Chill: Divide dough in half. Flatten each into a disc, wrap, and chill for at least 1 hour. Chilled dough rolls cleaner and holds shape better.
- Preheat and prep: Heat the oven to 350°F (175°C).
Line baking sheets with parchment paper.
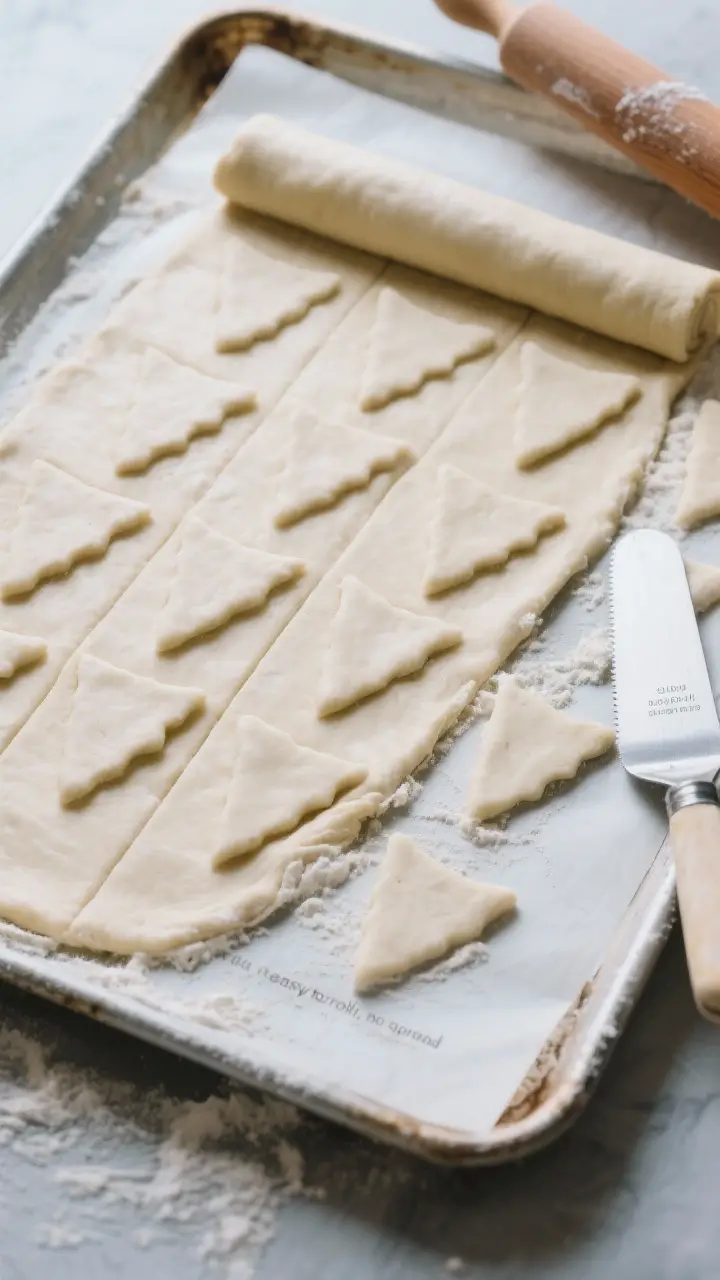
- Roll it out: Lightly flour your work surface and rolling pin. Roll one disc to about 1/4 inch thick for softer cookies, or 1/8 inch for crispier ones. Rotate the dough as you roll to prevent sticking.
- Cut shapes: Use cookie cutters to cut shapes, and transfer them to the prepared baking sheets using a thin spatula.
Gather scraps, re-roll once or twice, and keep cuts close to reduce waste.
- Bake: Bake 8–11 minutes, depending on thickness and size. Remove when edges are barely golden and centers look set. Do not overbake.
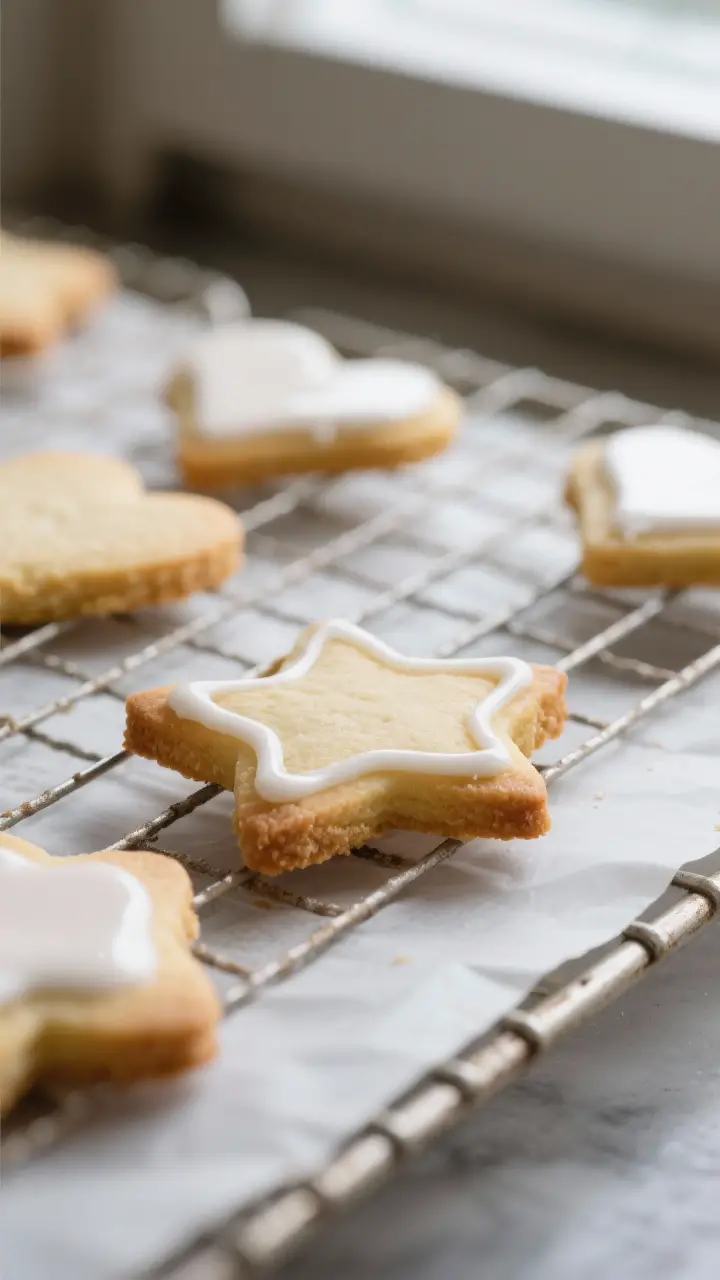
- Cool completely: Let cookies rest on the sheet for 2 minutes, then transfer to a rack.
Cool fully before icing.
- Make simple icing: Stir together 2 cups powdered sugar with 2–3 tablespoons milk and 1/2 teaspoon vanilla until smooth and drizzleable. For shine and slight set, add 1 teaspoon light corn syrup. Adjust with more milk or sugar as needed.
- Decorate: Divide icing, tint with food coloring, and pipe or spread onto cooled cookies.
Add sprinkles while icing is wet. Let set 2–4 hours.
Storage Instructions
- Room temperature: Store decorated or plain cookies in an airtight container for up to 5 days. Separate layers with parchment.
- Refrigerator: Not necessary for the cookies and can dry them out.
Keep at room temperature unless using a dairy-heavy frosting.
- Freezer (baked): Freeze undecorated cookies up to 2 months. Thaw in the container to prevent condensation.
- Freezer (dough): Wrap dough discs tightly and freeze up to 2 months. Thaw overnight in the fridge before rolling.
- Icing storage: Cover and refrigerate leftover icing up to 1 week.
Stir before using.

Why This is Good for You
- Simple, familiar ingredients: No additives or mystery oils—just butter, flour, sugar, and flavorings you recognize.
- Mindful sweetness: The cookie itself isn’t overly sweet, so you can control sugar by adjusting icing and decorations.
- Creativity and connection: Baking and decorating with friends or kids is a hands-on activity that’s grounding and fun.
- Portion control is easy: Smaller cutters make bite-sized treats, and the dough isn’t too rich or heavy.
Pitfalls to Watch Out For
- Skipping the chill: Warm dough spreads and loses shape. Chilling is non-negotiable.
- Overmixing: Overworking the dough makes tough cookies. Mix just until combined.
- Too much flour on the counter: Excess flour toughens cookies.
Lightly dust the surface and brush off extra from the dough.
- Overbaking: Pale is perfect. If edges brown too much, the cookies will be dry.
- Rolling unevenly: Thick and thin spots bake at different rates. Use rolling pin guides or two identical wooden spoons as spacers.
- Icing too thin or thick: If icing runs, add more powdered sugar.
If it won’t spread, add a few drops of milk.
Variations You Can Try
- Lemon sugar cookies: Add 1 tablespoon lemon zest to the dough and 1 teaspoon lemon juice to the icing.
- Warm spice: Mix 1 teaspoon ground cinnamon and a pinch of nutmeg into the dry ingredients.
- Cocoa twist: Replace 1/3 cup flour with 1/3 cup unsweetened cocoa powder for chocolate cutouts.
- Brown butter: Brown the butter, cool until solid, then cream as directed. Expect deeper, nutty flavor.
- Gluten-free: Use a cup-for-cup gluten-free flour blend with xanthan gum. Chill well and handle gently.
- Royal icing finish: For sharper designs, use royal icing made with meringue powder for a firm, glossy set.
- Sprinkle edges: Brush cutouts lightly with milk and dip edges into sanding sugar before baking.
FAQ
Do I have to chill the dough?
Yes.
Chilling relaxes the gluten and firms the butter, which prevents spreading and makes the dough easier to handle. An hour is the minimum; overnight is even better.
How thick should I roll the dough?
For a soft, tender cookie, aim for 1/4 inch thick. For a snappier, crisp cookie, roll to 1/8 inch.
Keep thickness consistent for even baking.
Why are my cookies tough?
Overmixing or adding too much flour usually causes toughness. Mix just until the dough comes together and use only a light dusting of flour on the counter.
Can I flavor these without almond extract?
Absolutely. Use all vanilla, or try lemon, orange, or maple extract.
Start with 1/2 teaspoon of any additional extract and adjust to taste.
How do I keep edges sharp?
Work with cold dough, use parchment-lined sheets, and bake as soon as you cut and place the cookies. If the kitchen is warm, chill the cut cookies on the tray for 10 minutes before baking.
What’s the best way to decorate with kids?
Make a few colors of slightly thicker icing, set out sprinkles, and use small squeeze bottles or butter knives. Keep designs simple and let the icing set on racks lined with parchment for easy cleanup.
Can I make these dairy-free?
Yes.
Use a good dairy-free butter stick alternative, not a spread from a tub. Check salt levels and adjust to taste, since some substitutes are salted.
Final Thoughts
Cut out sugar cookies are timeless for a reason. The dough is dependable, the flavor is classic, and decorating them turns baking into an activity everyone can enjoy.
With a good chill, a gentle hand, and a watchful eye in the oven, you’ll get cookies that look sharp and taste even better. Keep this recipe in your back pocket for every season, and you’ll always have a beautiful batch ready to share.
Printable Recipe Card
Want just the essential recipe details without scrolling through the article? Get our printable recipe card with just the ingredients and instructions.