
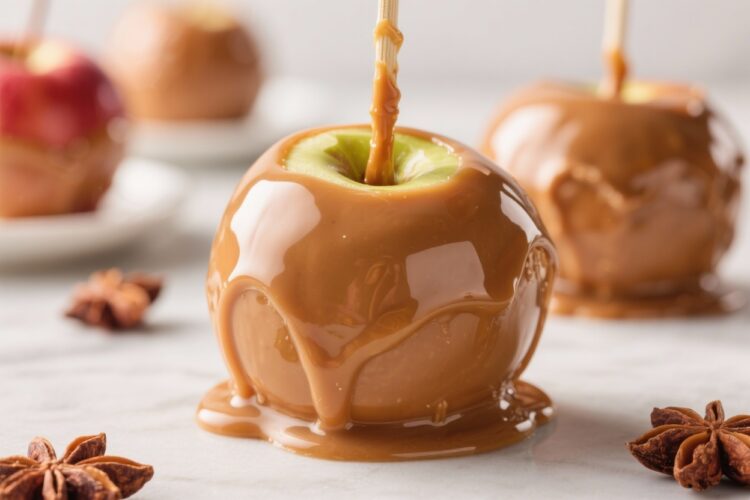
If you’ve ever strolled down Main Street with a caramel apple in hand, you know exactly how magical that first bite tastes. This copycat version gets you all the apple pie flavors—warm cinnamon, sweet caramel, and a buttery graham cracker crunch—without a plane ticket. It’s simple enough for a weekend treat and impressive enough for a party platter.
Even better, you can make them ahead and customize every layer. You’ll get that signature Disney-style finish with ingredients you probably already have.
What Makes This Recipe So Good
- Layered flavor like the parks: Crisp Granny Smith apples, creamy caramel, white chocolate, and cinnamon sugar recreate that apple pie vibe.
- Great texture: The snap of chocolate and the crunch of graham crumbs against a tender apple is incredibly satisfying.
- Surprisingly simple: No candy thermometer required if you use store-bought caramels or caramel bits.
- Kid-friendly and party-ready: They look impressive but are easy to decorate, wrap, and share.
- Make-ahead: These hold well in the fridge, so you can prep them the day before a gathering.
What You’ll Need
- 6 small to medium Granny Smith apples (firm, tart, and cold)
- 6 wooden sticks (popsicle or caramel apple sticks)
- 1 (11–14 oz) bag soft caramel candies or caramel bits (about 2.5–3 cups)
- 2–3 tablespoons heavy cream or milk (for silky caramel)
- 10–12 oz white chocolate melting wafers (or almond bark/white candy coating)
- 6–8 graham crackers (crushed into fine crumbs)
- 1/4 cup granulated sugar
- 1–1.5 teaspoons ground cinnamon
- 1 tablespoon unsalted butter (optional, for flavor and shine in caramel)
- 1 teaspoon vanilla extract (optional)
- Parchment paper or silicone baking mat
- Microwave-safe bowls or a double boiler
Step-by-Step Instructions
- Prep the apples: Wash the apples well to remove wax. For best results, scrub with hot water and a bit of vinegar, then dry thoroughly.
Remove stems and push a wooden stick into the top center of each apple. Refrigerate the apples while you prep the coatings. Cold apples help the caramel set quickly.
- Set up your station: Line a baking sheet with parchment or a silicone mat.
Place graham cracker crumbs in a shallow dish. Mix the sugar and cinnamon in another small bowl and set aside.
- Melt the caramel: In a microwave-safe bowl, combine caramels and heavy cream. Microwave in 20–30 second bursts, stirring between each, until smooth and glossy.
Stir in butter and vanilla if using. If it’s too thick, add a splash more cream.
- Dip in caramel: Hold an apple by the stick and dip, swirling to coat evenly. Let excess drip off, then gently scrape the bottom against the bowl’s rim to avoid pooling.
Place on the lined sheet. Repeat with remaining apples. Let the caramel set for 10–15 minutes at room temperature or 5–10 minutes in the fridge.
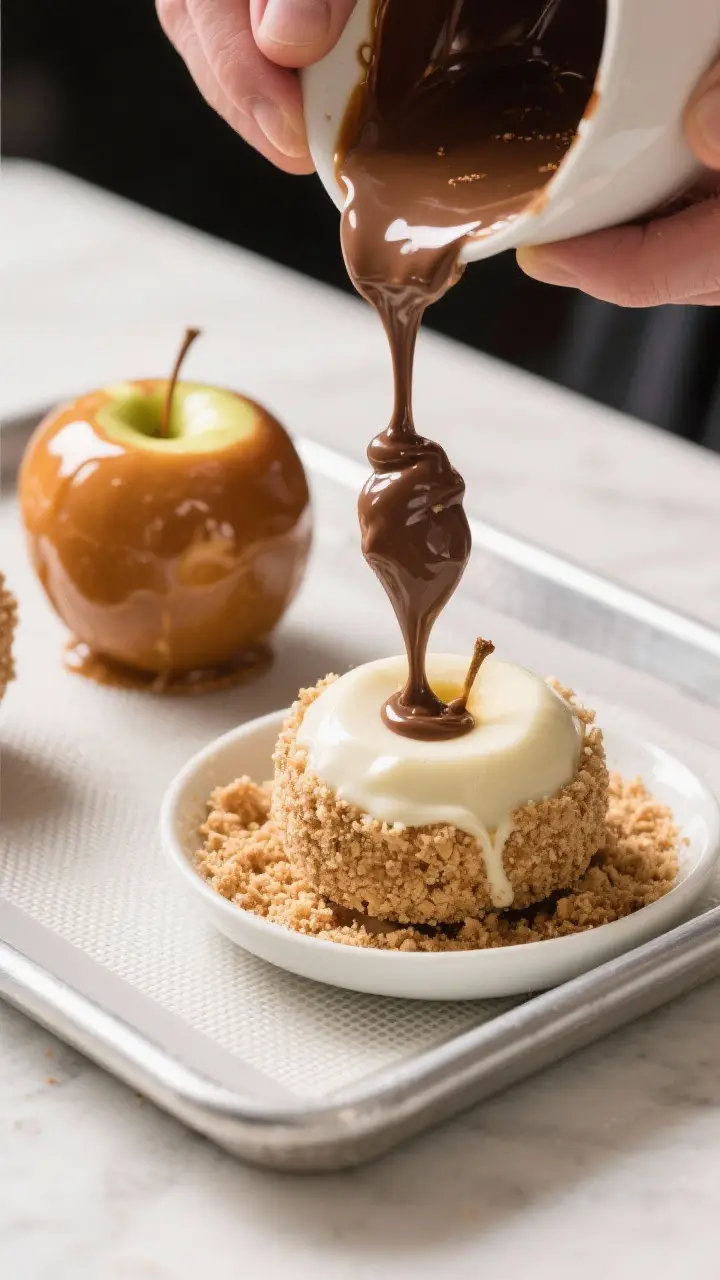
- Melt the white chocolate: In a clean bowl, melt white chocolate wafers in short intervals, stirring until smooth.
If using real white chocolate, add a teaspoon of neutral oil to help prevent seizing.
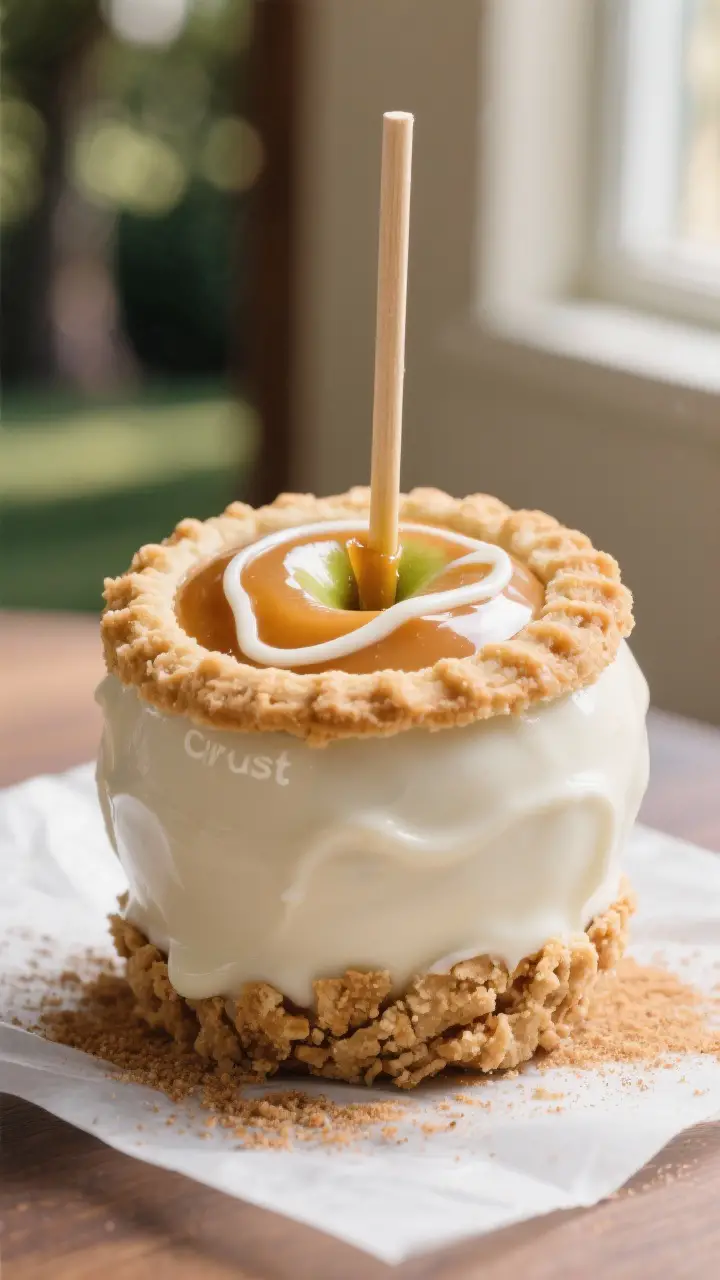
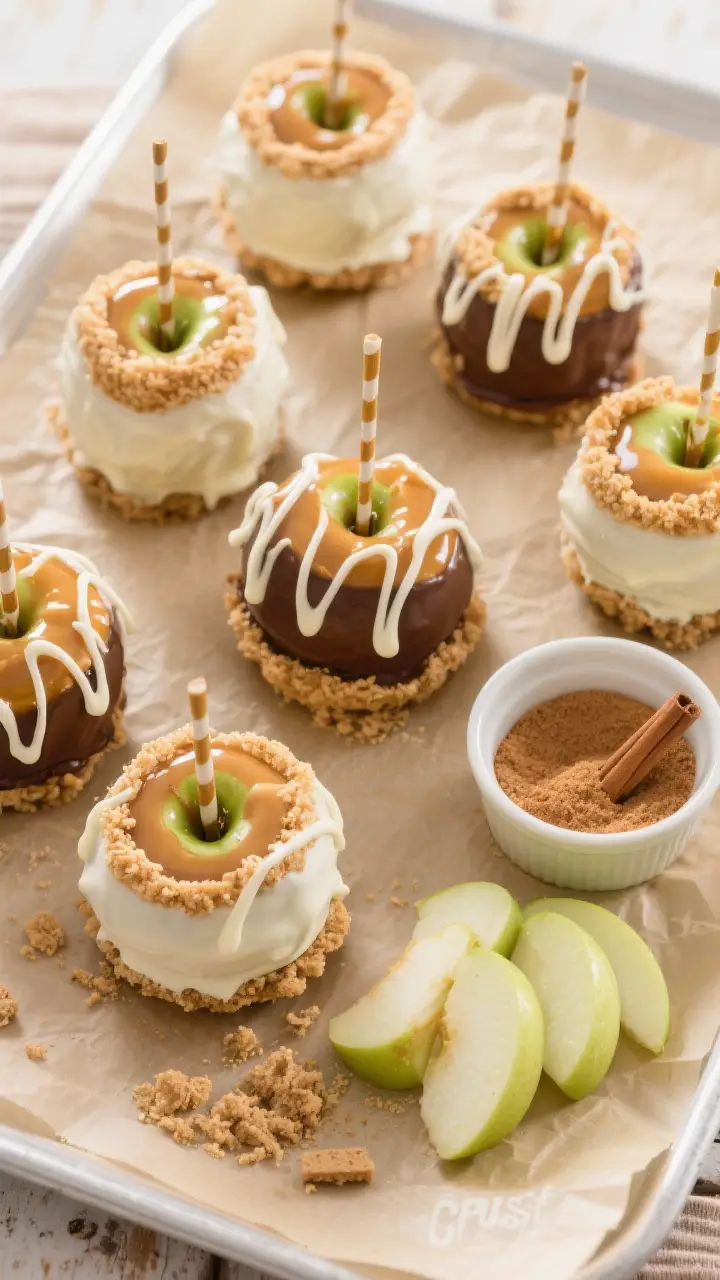
- Coat with white chocolate: Dip each caramel-coated apple in the white chocolate, leaving a thin, even layer. Let excess drip off. While still tacky, roll the bottom half of the apple in graham cracker crumbs to create a thick pie “crust” band.
- Add the cinnamon-sugar finish: Sprinkle the cinnamon sugar over the chocolate-coated areas that aren’t covered in crumbs.
You can roll lightly or dust from above for a clean look.
- Set and decorate: Place apples back on the lined sheet to set completely. For a Disney-style touch, drizzle extra white chocolate across the top. Let them firm up for 20–30 minutes at room temperature or refrigerate for 10–15 minutes.
- Clean the bottoms: If any chocolate pooled, trim gently with a paring knife once set for a neat, professional finish.
- Serve: Slice with a sharp chef’s knife into wedges, or enjoy whole.
For clean slices, chill for 10 minutes before cutting.
How to Store
- Room temperature: Keep in a cool, dry spot for up to 24 hours if your kitchen isn’t warm. Avoid direct sunlight.
- Refrigerator: Store individually wrapped in wax or parchment paper inside an airtight container for up to 3–4 days.
- Freezer: Not recommended. The apple’s texture suffers and the coatings can crack.
- Make ahead: Prepare the day before serving.
Pull out 20 minutes before eating to soften the chocolate slightly.
Benefits of This Recipe
- Budget-friendly treat: One batch makes several large apples for a fraction of theme park prices.
- Customizable: Adjust the cinnamon, add drizzles, or change the chocolate to match your taste.
- No special tools needed: Simple bowls, a baking sheet, and basic pantry ingredients do the job.
- Fun project: Great for birthdays, fall festivals, bake sales, or just a cozy weekend at home.
- Portable dessert: Wrap in cellophane with a ribbon for easy gifting or party favors.
What Not to Do
- Don’t skip de-waxing the apples: Wax prevents caramel from sticking. A hot water rinse and thorough dry are essential.
- Don’t dip warm apples: Warm apples make the caramel slide off. Cold apples work best.
- Don’t overheat the caramel or chocolate: High heat leads to scorching or seized chocolate.
Melt in short bursts and stir often.
- Don’t rush the setting time: Let each layer firm up before adding the next for clean, even coatings.
- Don’t store uncovered: Moisture and fridge odors can affect flavor and texture. Wrap or use airtight containers.
Recipe Variations
- Classic caramel only: Skip the white chocolate and toppings for a purist’s caramel apple.
- Apple pie spice: Swap the cinnamon with a blend of cinnamon, nutmeg, and allspice for extra warmth.
- Cinnamon white chocolate: Stir a pinch of cinnamon directly into the melted white chocolate for deeper flavor.
- Gluten-free: Use gluten-free graham crackers or crushed gluten-free cookies.
- Salted twist: Sprinkle flaky sea salt over the caramel layer before coating in white chocolate.
- Nut crunch: Add a ring of finely chopped pecans or walnuts under or over the graham crumbs.
- Chocolate drizzle duo: Finish with both white and dark chocolate drizzles for a bakeshop look.
FAQ
Which apples work best for caramel apples?
Granny Smith apples are the top choice because their tartness balances the sweet caramel and chocolate. Honeycrisp, Pink Lady, or Fuji also work, but they’ll be sweeter and slightly softer.
How do I keep the caramel from sliding off?
Start with cold, de-waxed apples and dry them thoroughly.
Let the caramel cool slightly before dipping, and scrape excess off the bottom. Give the caramel time to set before adding chocolate.
Can I make my own caramel from scratch?
Yes. Cook sugar with water to a deep amber, then whisk in warm cream and butter.
It’s delicious, but store-bought caramels or caramel bits are easier and more consistent for beginners.
My white chocolate seized. Can I fix it?
If the chocolate turns grainy and thick, try stirring in a teaspoon of neutral oil or cocoa butter while warm. If it’s badly seized, it’s best to start over with fresh chocolate and gentle heat.
How do I slice caramel apples cleanly?
Chill the apples for 10–15 minutes to firm the layers.
Use a sharp chef’s knife to cut off two sides around the core, then slice each slab into wedges.
How far in advance can I make these?
They’re best within 48 hours. Make them the day before serving, keep them chilled and wrapped, and bring to room temp briefly before enjoying.
Can I use chocolate chips instead of melting wafers?
You can, but wafers or almond bark melt smoother and set harder. If using chips, add a teaspoon of neutral oil to improve texture and shine.
In Conclusion
These Copycat Disney Apple Pie Caramel Apples bring that nostalgic, theme park magic straight to your kitchen.
With a tart, crisp apple under buttery caramel, creamy white chocolate, cinnamon sugar, and graham crunch, every bite tastes like a cozy slice of pie on a stick. They’re easy to customize, simple to make, and perfect for sharing. Make a batch, wrap a few for friends, and keep one for yourself—you earned it.
Printable Recipe Card
Want just the essential recipe details without scrolling through the article? Get our printable recipe card with just the ingredients and instructions.