
Warm, crusty bread bowls make even a simple soup feel special. Using frozen dough means you can skip the mixer and still get bakery-style results at home. You’ll shape, proof, and bake small boules that are sturdy on the outside and soft inside—perfect for scooping and dipping.
If you’ve never made bread bowls before, this is an easy, low-stress way to start. You’ll get consistent results and a fun, edible serving dish with minimal effort.
Why This Recipe Works
This method leans on frozen bread dough, which is already balanced for gluten development, yeast activity, and hydration. That gives reliable rise without guesswork.
Shaping into tight little rounds builds surface tension, so the bowls keep their shape and don’t slump. A quick steam setup in your oven helps create a thick, crackly crust that stands up to hot soup. Finally, a short second bake after hollowing out dries the interior slightly, preventing sogginess when you fill them.
What You’ll Need
- Frozen bread dough: 1 loaf (about 1 pound/450 g) makes 2 medium bowls; 2 loaves make 4 bowls.
- All-purpose flour for dusting
- Olive oil or neutral oil for greasing
- Egg (optional, for egg wash)
- Water for steam and egg wash
- Cornmeal (optional, for the baking sheet)
- Coarse salt or seeds (optional topping)
- Baking sheet or pizza stone
- Sharp serrated knife or lame for scoring
- Kitchen shears (optional)
- Small oven-safe pan for creating steam
Step-by-Step Instructions
- Thaw the dough: Place the frozen dough in a lightly oiled bowl.
Cover loosely and thaw in the refrigerator overnight (8–12 hours) or at room temperature for 3–5 hours until pliable but still cool. It should not be proofed yet—just thawed.
- Divide and pre-shape: For medium bowls, cut each 1-pound loaf into two equal pieces. Lightly flour your hands and the counter.
Gently pat each piece into a rough rectangle, then fold edges toward the center to form a loose ball.
- Build tension: Flip the dough seam-side down. Cup your hands around the ball and pull it toward you on the counter, letting friction tighten the surface. Rotate and repeat until you have a smooth, taut sphere.
This step ensures a round, sturdy bowl.
- Rest the dough: Cover the rounds with a clean towel and let them relax for 10–15 minutes. This short rest makes final shaping easier and prevents tearing.
- Final shaping: Repeat the tension-building step once more to reinforce the shape. Place the rounds seam-side down on a cornmeal-dusted baking sheet or a parchment-lined sheet.
- Proof: Lightly brush with oil or cover with a greased piece of plastic wrap.
Let rise at warm room temperature until puffed and about 50% larger, 45–75 minutes depending on warmth. The dough should spring back slowly when gently poked.
- Preheat and steam setup: About 20 minutes before baking, preheat your oven to 425°F (220°C). Place a small metal pan on a lower rack to heat.
This will create steam that helps develop a crisp crust.
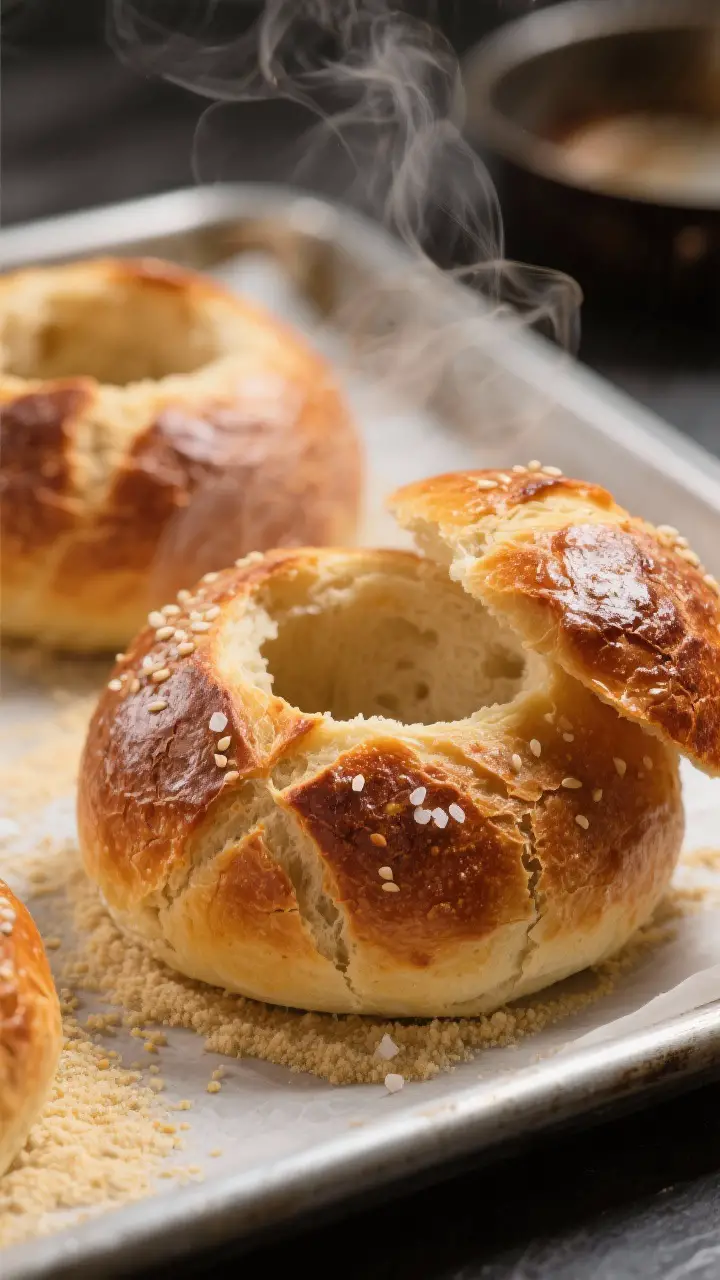
- Optional egg wash: Whisk 1 egg with 1 tablespoon of water. Brush lightly on the proofed rounds for a glossy finish. Sprinkle with coarse salt or seeds if you like.
- Score the tops: Use a sharp serrated knife or lame to make a shallow X or cross on top of each round (about 1/4 inch deep).
Scoring controls expansion and helps keep the bowls evenly round.
- Bake with steam: Place the sheet in the oven. Carefully pour 1 cup of hot water into the preheated pan to create steam, then close the door quickly. Bake for 22–28 minutes until deep golden brown and hollow-sounding when tapped.
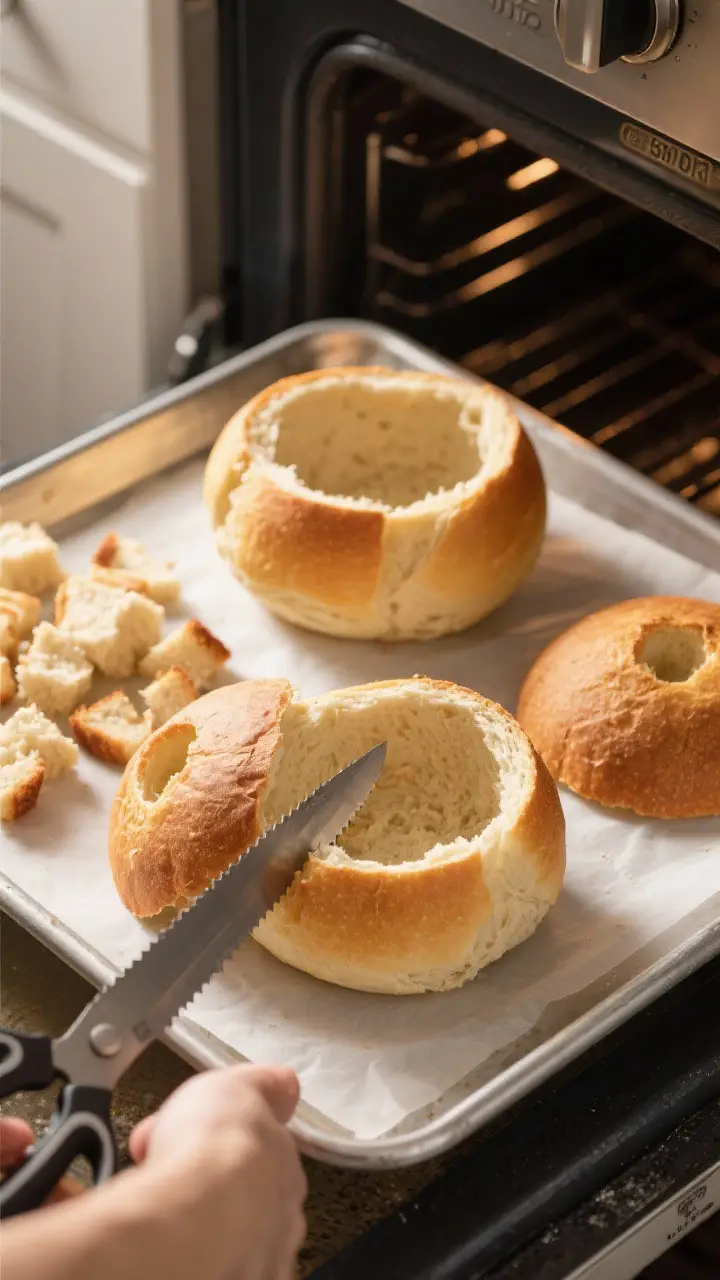
- Cool slightly: Transfer to a rack and cool for 15–20 minutes.
Cooling firms up the crumb so it’s easier to hollow out without tearing.
- Create the bowl: Use a small serrated knife to cut a circular lid from the top, about 3–4 inches across. Pull out the interior bread, leaving a 1/2–3/4 inch wall and base. Reserve the soft bread for croutons or snacking.
- Dry the interior (optional but recommended): Return the hollowed bowls (without lids) to the oven for 5–8 minutes at 350°F (175°C) to set the interior.
This step helps prevent leaks and sogginess.
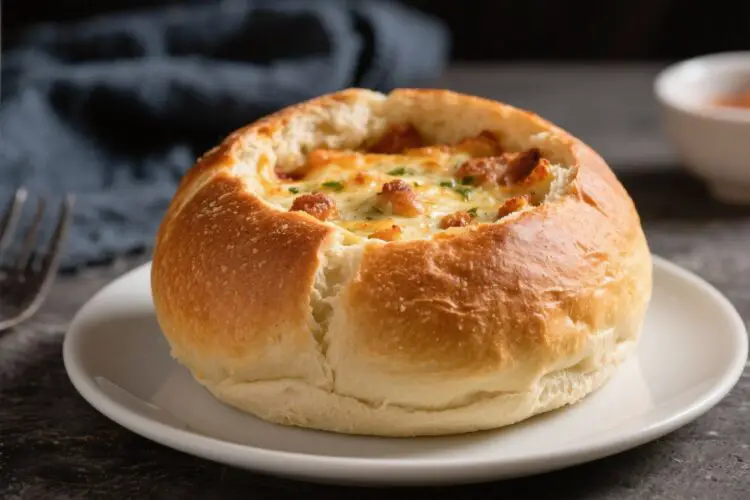
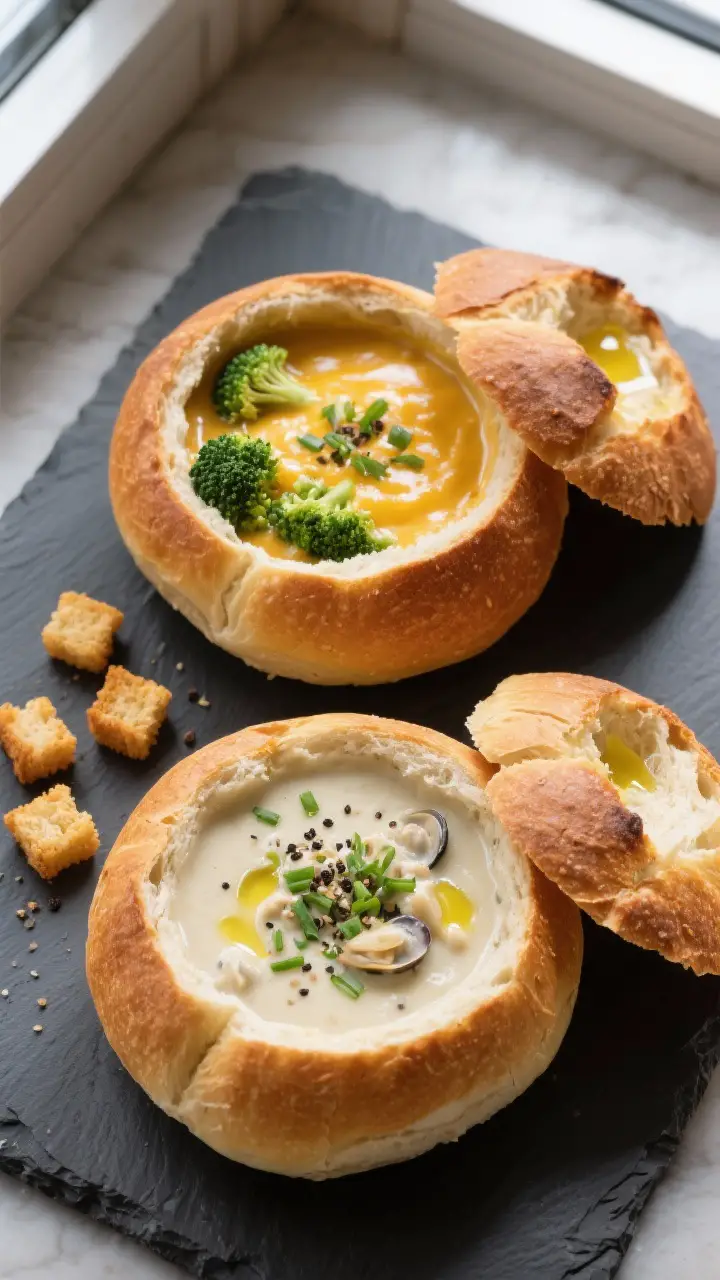
- Serve: Fill with hot soup, chili, or creamy dips. Warm the lids alongside for a minute or two and serve on top or on the side for dipping.
How to Store
- Short-term: Keep baked, unfilled bowls at room temperature in a paper bag for up to 24 hours. Paper preserves crust better than plastic.
- Longer storage: Freeze baked bowls (fully cooled) in a zip-top bag for up to 2 months.
Reheat at 350°F (175°C) for 10–12 minutes to refresh.
- Leftovers: If filled, store in the fridge, uncovered, for up to 1 day, understanding the crust will soften. Reheat on a baking sheet at 325°F (165°C) to warm through.
Health Benefits
Bread bowls aren’t a health food, but you can make choices that keep them reasonable. Using whole-grain frozen dough adds fiber and micronutrients.
Pairing the bowl with protein-rich, veggie-forward fillings—like lentil soup, chicken chili, or roasted tomato and white bean—balances the carbs. Portion-wise, smaller bowls with a generous salad on the side deliver comfort without overdoing it.
What Not to Do
- Don’t rush proofing. Under-proofed dough will burst awkwardly and can bake up dense.
- Don’t skip scoring. Without it, the bowls can split at the sides and lose their shape.
- Don’t carve too thin. Walls thinner than 1/2 inch may leak, especially with hot, thin soups.
- Don’t skip the rest before hollowing. Cutting too soon tears the crumb and creates ragged, weak edges.
- Don’t store in plastic while warm. Traps steam and turns the crust soft and chewy in a bad way.
Alternatives
- Mini bowls: Divide a 1-pound loaf into 3–4 pieces for appetizer-sized bowls. Reduce bake time by a few minutes.
- Sourdough-style: Use frozen sourdough dough for tangy flavor and an even sturdier crust.
- Flavor boosts: Brush the proofed rounds with garlic butter or sprinkle with everything seasoning, sesame, or poppy seeds.
- Gluten-free: Use a gluten-free frozen dough designed for crusty loaves.
Shape gently and bake with steam to improve structure.
- Air fryer: For small bowls, air-fry at 360°F (182°C) for 12–16 minutes, checking for deep color and a hollow sound. Work in batches.
- Stone or Dutch oven: Bake on a preheated pizza stone for extra oven spring, or use a preheated Dutch oven with the lid on for the first 15 minutes to concentrate steam.
FAQ
How do I know when the dough is proofed enough to bake?
Do the poke test. Gently press a floured finger into the dough.
If the dent springs back slowly and doesn’t fully fill in, it’s ready. If it pops back quickly, give it more time.
My bowls turned out pale. What went wrong?
Your oven may have been underheated or missing steam.
Preheat longer, bake at 425°F, and add hot water to a preheated pan. A light egg wash also helps color.
Can I make the bowls ahead?
Yes. Bake, cool, and freeze them uncut.
Thaw at room temp, then warm at 350°F before cutting and hollowing. They’ll taste freshly baked and keep their crust.
What soups work best in bread bowls?
Thicker soups and chilis are ideal: broccoli cheddar, clam chowder, potato leek, tomato basil, or beef and bean chili. Very thin broths can soak the bread faster.
How do I prevent leaks?
Leave at least 1/2 inch thickness in the walls and base, and do the short second bake to dry the interior.
Filling with hot—not boiling—soup also helps.
Can I use dinner roll dough?
Yes, but check the weight. You’ll need rolls of about 6–8 ounces each for small bowls. Bake times will be shorter, so watch for color and doneness.
What can I do with the scooped-out bread?
Toss with olive oil, salt, and pepper and bake at 375°F for 10–12 minutes for croutons.
Or pulse into breadcrumbs for meatballs, casseroles, or topping bakes.
How can I get a thicker crust?
Bake on a preheated stone, use steam in the first 10 minutes, and extend the bake by 2–3 minutes for deeper color. Let the bowls cool on a wire rack to keep the crust crisp.
Wrapping Up
Bread bowls from frozen dough give you the joy of fresh-baked bread with hardly any fuss. With a good proof, a tight shape, and a bit of steam, you’ll get sturdy bowls and a tender interior every time.
Fill them with your favorite cozy soup or creamy dip, and don’t forget to toast the lids. It’s simple, satisfying, and guaranteed to make dinner feel special.