
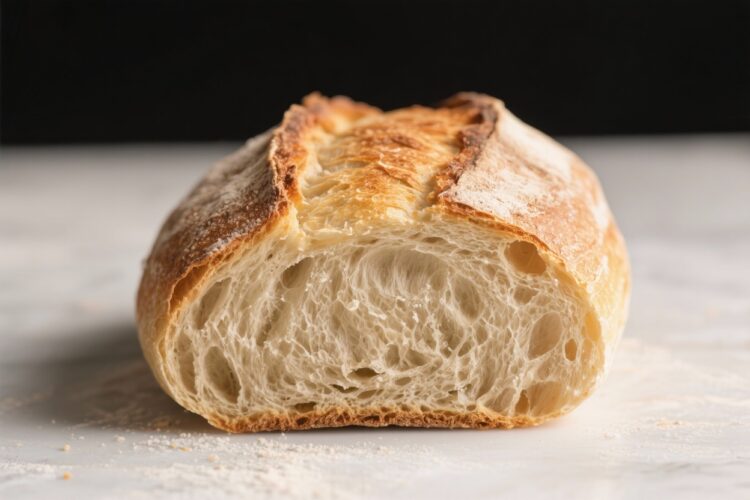
Sourdough doesn’t have to be fussy or intimidating. This simple sour dough bread gives you a crisp crust, a tender crumb, and great flavor with just a few steps. It’s the kind of loaf you’ll want on your counter every week, perfect for toast, sandwiches, or a bowl of soup.
Even if you’re new to sourdough, this method is forgiving and easy to follow. All you need is a healthy starter, time, and a little patience.
What Makes This Recipe So Good
- Foolproof method: Clear steps that guide you from mixing to baking, with simple cues to know when to move on.
- Great texture: Expect a crackly crust and a soft, slightly chewy interior with a mild tang.
- Flexible timing: The dough is happy to rest in the fridge, so you can bake on your schedule.
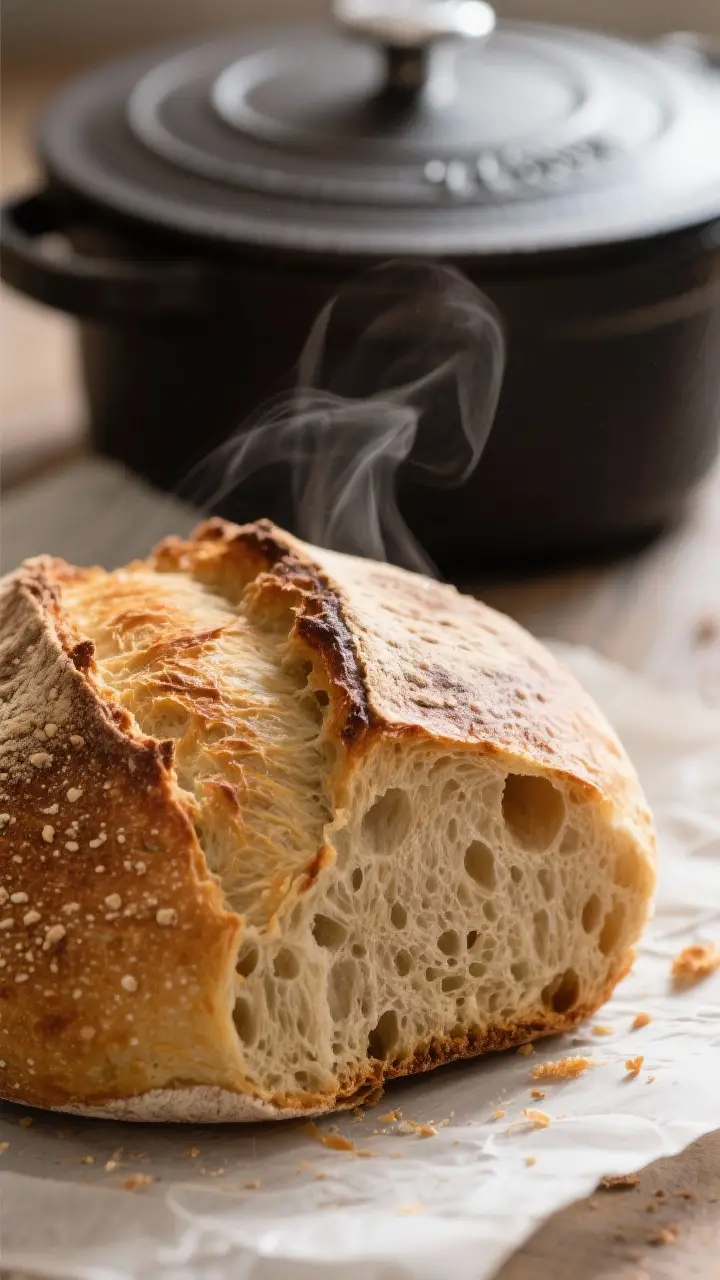
- Minimal equipment: A bowl, a spoon, and a Dutch oven are enough to make bakery-quality bread at home.
- Everyday flavor: Balanced sourness that works for both sweet and savory toppings.
Ingredients
- Active sourdough starter: 100 g (fed and bubbly)
- Warm water: 350 g (about 80–85°F / 27–29°C)
- Bread flour: 450 g
- Whole wheat flour: 50 g
- Fine sea salt: 10 g (about 1 3/4 tsp)
- Rice flour or extra wheat flour: for dusting the proofing basket
Instructions

- Check your starter. Make sure it’s active: it should have doubled after feeding, look airy, and pass the float test (a small spoonful floats in water). If it’s sluggish, give it another feeding and wait.
- Mix the levain and water. In a large bowl, whisk the 100 g starter with 350 g warm water until cloudy and combined.
- Add the flours. Stir in 450 g bread flour and 50 g whole wheat flour until no dry bits remain.
The dough will look shaggy. Cover and rest for 30 minutes. This autolyse hydrates the flour and makes the dough easier to handle.
- Add salt and squeeze it in. Sprinkle 10 g salt over the dough.
Wet your hand and pinch/squeeze the dough to incorporate the salt, then fold the dough over itself a few times. Cover.
- Bulk ferment with gentle folds. Over the next 2–3 hours at room temperature (around 72°F/22°C), perform 3–4 sets of stretch-and-folds, about 30 minutes apart. To do this, wet your hand, grab an edge of dough, stretch it up, and fold it to the center.
Turn the bowl and repeat 3–4 times. You should see the dough become smoother and slightly puffier.
- Let it rise until slightly domed. After the folds, let the dough rest until it’s about 50% larger, feels airy, and jiggles when you shake the bowl. Timing varies by temperature; cooler rooms take longer.
- Lightly flour the surface and pre-shape. Turn the dough onto a lightly floured counter.
Use a bench scraper to tuck the edges toward the center and form a loose round. Let it rest uncovered for 15–20 minutes to relax.
- Final shape. For a round loaf, dust the top of the dough, flip it so the floured side is down, then gently stretch and fold the bottom up, the sides in, and roll it into a tight ball. For a batard (oval), fold like an envelope and roll into a log, sealing the seam.
- Prepare the basket. Generously dust a proofing basket or a bowl lined with a clean towel with rice flour (or a mix of rice and wheat flour).
Place the dough seam-side up in the basket.
- Proof. Cover and let the dough proof at room temperature for 45–90 minutes until slightly puffy. For best flavor and easier scoring, cold proof in the fridge for 8–18 hours. The dough will firm up and be easier to handle.
- Preheat the oven and Dutch oven. Place a Dutch oven with its lid in your oven and preheat to 475°F (245°C) for at least 30 minutes.
- Score and load. Cut a sheet of parchment, invert the dough onto it so the seam is down, and use a sharp lame or knife to score a 1/2-inch deep slash along the top.
This helps the loaf expand.
- Bake with steam. Carefully lower the dough (on its parchment) into the hot Dutch oven. Cover and bake for 20 minutes.
- Finish uncovered. Remove the lid, lower the oven to 450°F (232°C), and bake 20–25 minutes more, until deep golden brown with blistered crust. The loaf should sound hollow when tapped and register around 208–210°F (97–99°C) inside.
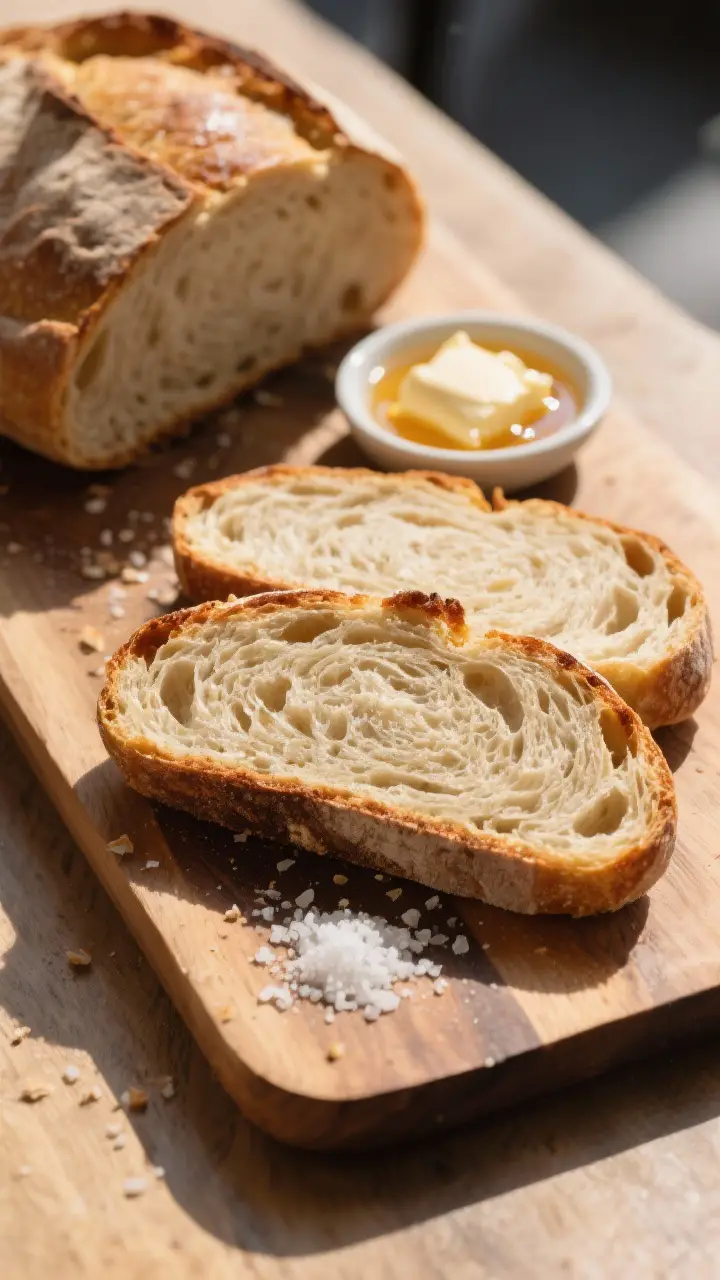
- Cool completely. Transfer to a rack and wait at least 1 hour before slicing.
This sets the crumb and keeps it moist.
How to Store
- Room temperature: Keep the loaf cut-side down on a board or in a paper bag for 1–2 days. This keeps the crust crisp.
- Longer storage: Wrap in a clean towel or place in a bread box for up to 3–4 days. The crust will soften but the crumb stays nice.
- Freezer: Slice, then freeze in a zip-top bag for up to 2 months.
Toast straight from frozen.
- Avoid plastic on the counter: It traps moisture and makes the crust rubbery.
Why This is Good for You
- Natural fermentation: Sourdough’s wild yeast and bacteria help break down parts of the flour, which can make the bread easier to digest for some people.
- Better flavor with fewer ingredients: Just flour, water, and salt—no additives—yet rich, complex taste.
- Steadier energy: The fermentation can slightly lower the bread’s glycemic impact compared to some quick-yeast loaves.
- Whole grain boost: A touch of whole wheat adds fiber, minerals, and nutty flavor.
Pitfalls to Watch Out For
- Weak starter: If your starter isn’t lively, your dough won’t rise well. Feed it until it reliably doubles before baking.
- Rushing bulk fermentation: Underproofed dough often leads to dense, tight crumb. Look for a 50% rise, a soft, airy feel, and a gentle jiggle.
- Too much flour during shaping: Excess flour creates weak seams that can burst.
Use just enough to prevent sticking.
- Skipping the score: Without a proper slash, the loaf can tear at random spots. A clean, confident cut guides the oven spring.
- Slicing too soon: Cutting hot bread compresses the crumb and makes it gummy. Let it cool.
Recipe Variations
- Seeded crust: After shaping, lightly mist the dough and roll it in sesame, poppy, or sunflower seeds.
Adds crunch and flavor.
- Olive and herb: Fold in 120 g chopped olives and 2 tsp chopped rosemary during the last set of folds in bulk fermentation.
- Higher whole wheat: Swap up to 150 g of the bread flour for whole wheat. You may need an extra 10–20 g water.
- Overnight country loaf: Mix in the evening, bulk ferment at room temp for 2–3 hours, then cold proof overnight and bake in the morning.
- Garlic-parmesan: Add 2 tbsp finely grated Parmesan and 1 tsp granulated garlic during the second fold for a savory loaf.
FAQ
How do I know my dough is ready to bake?
The dough should feel airy and hold its shape when turned out. A gentle finger poke should slowly spring back.
If you cold proofed, it may not look dramatically bigger, but it should feel firm and look slightly domed.
Can I use all-purpose flour instead of bread flour?
Yes. All-purpose works, though the loaf may be slightly less chewy and the structure a bit softer. If using all-purpose, hold back 10–20 g of water, then add as needed to reach a tacky, not soupy, dough.
What if I don’t have a Dutch oven?
Use a preheated baking stone or sheet and place a metal pan on a lower rack.
Pour a cup of hot water into the pan right after loading the loaf to create steam. Bake until golden and crisp.
Why is my bread too sour?
Long, warm ferments increase acidity. To reduce tang, use a younger starter (recently fed), keep bulk fermentation on the shorter side, and cold proof rather than leaving it warm for hours.
Why didn’t my loaf rise much?
Common causes are an inactive starter, underdeveloped gluten, or underproofing.
Make sure your starter is lively, perform all the folds, and proof until the dough shows visible signs of aeration and lightness.
How wet should the dough feel?
It should be slightly sticky but workable. If it’s soupy, add a sprinkle of flour during folds. If it’s too stiff, wet your hands and perform more folds to help it relax and hydrate.
Can I add sweet mix-ins like raisins?
Absolutely.
Add 100–150 g raisins or chopped dried fruit during the second or third fold. A pinch of cinnamon pairs well, but keep added sugar modest to avoid slowing the rise.
Wrapping Up
This simple sour dough bread keeps the process straightforward and the results reliable. With a healthy starter, a few well-timed folds, and a hot oven, you’ll get a loaf that tastes like it came from a neighborhood bakery.
Use it for toast, sturdy sandwiches, or just warm slices with butter. Once you’ve baked it a couple of times, try a variation and make it your own. Happy baking and enjoy the crackle of that first slice.
Printable Recipe Card
Want just the essential recipe details without scrolling through the article? Get our printable recipe card with just the ingredients and instructions.