Easter is back! Easter Egg hunts, chocolate bunnies, and spicy hot cross buns… the perfect way to escape winter and start your spring and summer seasons. Rewatching the old Great British Bake Off, with Mary Berry and Paul Hollywood, I was reminded of just how much I love these easter traditions and it made me brush off my good old “How to Bake” by Paul Hollywood.
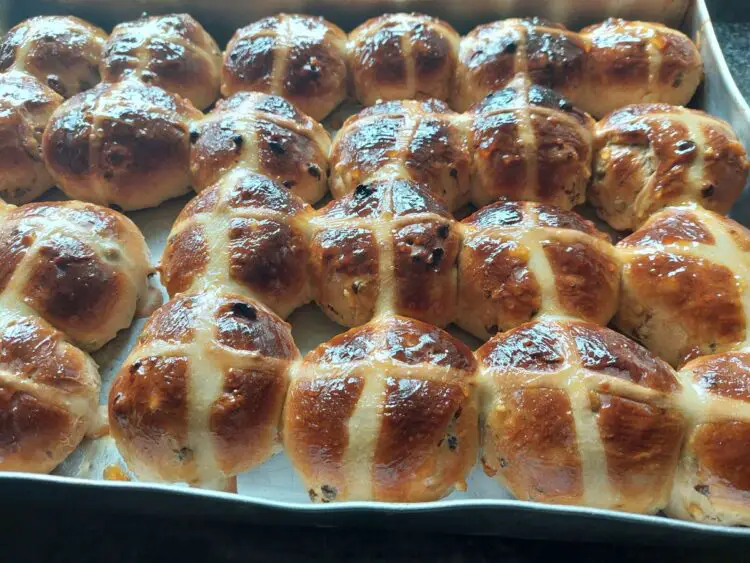
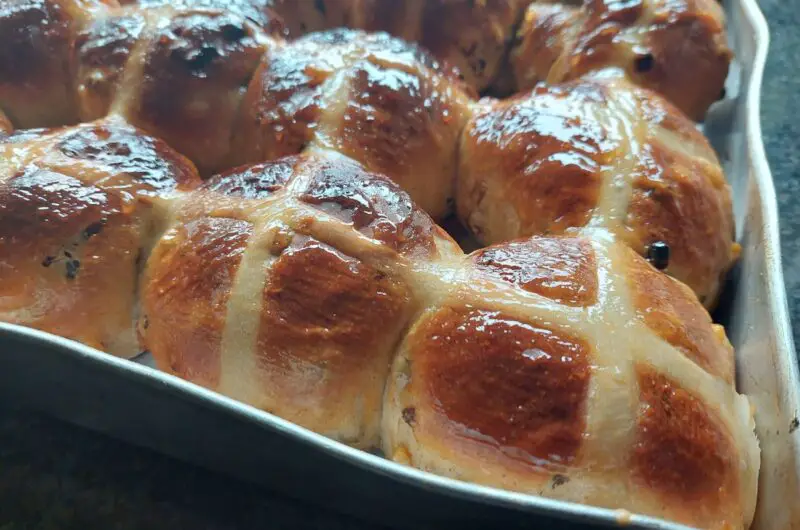
Hot cross buns are sweet, spiced, and made with fruit, bearing a cross on top and traditionally glazed with apricot jam to give them gloss and stickiness. Traditionally, hot cross buns are made with cinnamon, sultanas, candied citrus peel, and orange zest while the pale cross on top is believed to symbolize the crucifixion of Christ. In recent years, bakers have begun to experiment with flavor profiles, creating variations such as chocolate chip, caramel, and even savory options. For those looking to put a unique twist on the classic treat, a cinnaboninspired hot cross buns recipe merges the traditional spices with creamy frosting, resulting in a delightful fusion that appeals to both traditionalists and modern dessert lovers alike. Whether enjoyed fresh out of the oven or toasted with butter, these buns continue to hold a special place in culinary traditions around Easter and beyond.
Basic Hot Cross Bun process:
Note: for tips and tricks to make your hot cross buns even better and fluffier, use this guide.
- Make the bun dough.
- Knead the dough for 10 minutes.
- Cover the dough and let it rise for about 1 hour.
- Make a log
- Portion out
- Shape into rolls.
- Let the rolls rise for about 1 hour.
- Pipe the crosses on top.
- Bake for 20-25 minutes until golden brown.
- Top with an apricot-orange glaze.

What do these Hot Cross Buns taste like?
Hot Cross buns feel like dinner rolls and yet taste like cinnamon rolls. Soft, yet dense. Sweet yet bitter. Citrussy yet spiced. This particular variation adds the spiced notes of mulled wine to the buns from nutmeg, allspice and bitter orange for an extra reminder of festivities. Adding in currants increases the fruit content of the buns, making them ever so richer and filling.
Why do we love these hot cross buns?
- Bitter orange glaze
- Currants
- Treacle sugar
- Candied orange peel
- Cinnamon, nutmeg, allspice
What makes Paul Hollywood’s hot cross buns different?
- Diced dessert apple: Paul Hollywood’s original recipe calls for a diced dessert apple, which I did not have. While Paul Hollywood prefaces his recipe by suggesting that the apple imbues extra moistness to the buns.
- 3 rises of the dough: This allows the basic dough to rise without the fruits, which are added just before the 2nd rise.
- Hotter oven: – A hotter oven will cook the hot cross buns a bit faster and tends to yield a thinner crust when used for 20 minutes, making the buns absolutely perfect.
How do these hot cross buns differ from the original recipe?
- Treacle sugar: – The original recipe uses caster sugar while I prefer treacle sugar as it adds a depth of flavor more akin to molasses, which simply cannot be matched by caster sugar.
- Nutmeg: – Nutmeg adds natural sweetness and when used freshly ground, has such a distinct flavor profile that they add an undertone of warmth and good cheer.
- Allspice: – This spice adds a hint of other flavors reminding people of spices such as cloves, licorice, bay leaves, and star anise. It is just a hint, and yet adds a depth to the taste while the eucalyptus-like oils in allspice give the hot cross buns a deeper, more penetrating taste.
- Currants: – Sultanas are great, but they tend to be quite large. Adding a similar amount of currants provides a delicious twist to the standard flavor profile of hot cross buns. Also, if you rehydrate them in an orange-flavored liqueur such as Grand Marnier or Cointreau, you can add a quick burst of flavor.
- Orange candied peel: – If you can get these, add them as well. They enhance the overall orange flavor and modify the body of the hot cross buns. Too often folks split the buns in two and eat each half individually, which means that the orange zing from the glaze can be missed unless candied orange peel can be sourced.
- Orange marmalade: – I find most hot cross buns too sticky-sweet. Using a bitter jam such as an orange along with the traditional apricot jam allows the sweetness to be mellowed out while adding an unexpected dimension to the buns.
- Low-fat Milk: – This is a small step toward being healthier. Actually, I tend to have low-fat milk in the fridge and I do not find that it makes a huge difference. If I need the extra fat, I simply add a bit more butter to the dish,.
- Salted butter: – I do not find that using unsalted butter makes a great difference. We normally have salted butter in the fridge and I simply reduce the amount of salt in the recipe by the amount of salt in the butter that I use. This makes my shopping a lot easier and prevents me from having too many half-used tubs in the fridge.
- 2 rises and not 3. Paul Hollywood uses 3 rising steps. I find that this takes too long for not too much benefit. If I kneaded the dough by hand, I would definitely consider 3 rises to make the mixing of the fruits easier, but with a stand mixer, it is easy enough.
- Stand mixer: – I am sure that Paul Hollywood would have a sharp word or two to say about this one. Yes, kneading by hand is so much better, but these days, I am pressed for time and it is just faster to use a stand mixer.
No-knead hot cross buns versus kneading by hand or using a stand mixer?
The recipe below will work equally well with all 3 approaches. The final product will differ subtly but only a true expert would know the real difference and in any case, these are so much better than the store-bought versions that no one will really care if you cut a corner or two…
- Stand mixer: – This is probably the fastest and easiest approach, perfect if you are trying to multitask. I find that it takes me just as long to clean the stand mixer as it does to clean my work surface if I knead by hand, so the convenience is worth it.
- Be careful though not to make too great a batch of hot cross buns at once as the stand mixer bowl may be too small for all the ingredients and the gear mechanism may not be up to the task, especially if making a stiffer dough.
- Kneading by hand: – This is my preferred approach and perhaps the purist’s approach. I like the feel of the dough as it moves from a loose collection of ingredients to a very wet consistency and then starts to mesh together into the final product.
- This approach is a great stress reliever as it enables you to focus on the task at hand and to recenter yourself.
- Great for building up hand and arm muscles while reinforcing your core muscles. Most people dislike kneading because their countertop is simply at the wrong height, giving them backaches. Using a correctly positioned countertop is a breeze.
- No-knead version: – The easiest approach which just requires a couple of minutes of stirring with a spatula.
- The end product may look a bit odd as no structure was built into the dough as you were preparing it, but this can be compensated for by more care in rolling the buns and stacking them a bit closer together in the tray so that they are self-supporting.
- The buns will be slightly less fluffy as well, barely noticeable unless you place them side by side. They will still be far better than the store-bought stuff.
- They will not keep as well. This is an odd side-effect, but a consequence of not building up the gluten in the dough. No matter, just make slightly fewer at a time and enjoy them fresh… The house will smell even more cheerful when you make a new batch.
Paul Hollywood’s hot cross buns, Whaleycooks style
12
servings4
hours20
minutes200
kcal4
hours20
minutesPaul Hollywood and Mary Berry have graced our screen for years in the Great British Bake Off. I have taken the liberty of improving on Paul Hollywood’s great classic – the Easter Hot Cross Bun. Who knows? Perhaps this variation will make it into their next recipe book?
Ingredients
500g white plain (cake) flour plus extra for dusting
10g salt
75g caster sugar plus 1 tbsp for the yeast
10g instant yeast
40g butter
2 medium or large eggs
120 mL warm milk
120 mL lukewarm water
150g sultanas
80g chopped candied citrus (mixed) peel
Finely grated zest of 2 oranges
2 tsp ground cinnamon
1 dessert apple, cored and grated
- Whaleycooks additions
1/8 tsp freshly grated nutmeg
1/4 tsp allspice
75g currants – soaked overnight in brandy or cold tea
50g candied orange peel
- For the crosses
75g plain white flour
75 mL water
- Whaleycooks glaze modification
50g apricot jam
25g bitter orange marmalade
Directions
- The night before
- Place the currants in a bowl and soak in some brandy (or cold tea if you prefer) to rehydrate them. Cover the bowl with cling film and leave overnight
- Prepare the yeast
- Place 60 mL of the tepid/warm water in a glass, and add 1 tbsp of sugar and the dried yeast. Stir briefly to wet the yeast and set aside.

- Prepare the dough
- Chop the butter into small cubes and add to the mixing bowl. Allow mixing for 2 minutes to break the butter up.
- In the bowl of a bench mixer, add the sugar, salt, cinnamon, nutmeg, and allspice (if using). Use the kneading tool and start mixing on low to spread the ingredients.

- Add the eggs to the mixer and allow to mix for another minute.
- Add the warm milk and the bloomed yeast with the water from the glass (keep the last 60 mL aside for later on). Mix for 1 minute.
- Add the flour a little at a time until it is all incorporated. If the mix looks dry, add a little bit of the reserved water. Be cautious as it is easy to add too much. The dough should be moist and almost runny but still hold its shape. It may run up the kneading tool of the bench mixer, which is perfectly fine, just scrape it down from time to time.
- Once the dough comes together, increase the mixing speed to medium for about 10 minutes. The dough will have a wet stage and then it will become glossy and start to stick together and to the beater in a “ball”.
- Lower the mixing speed to low and drain the currants using a sieve.
- Add the currants sultanas, mixed citrus peel, and orange zest to the mixer. If using the apple, add it in now.
- Allow all of the fruits to incorporate into the mixer, then return it to medium or high speed and mix for another 3 minutes to ensure even dispersal of the fruits.
- First Rise
- Lightly grease a clean bowl (I use a non-stick spray) and scrape the dough into the bowl. Cover with a clean tea towel and allow to rise for at least 1 hour until it has doubled in size (this may take 2 or 3 hours if the room is cold).
- Shaping
- Lightly dust your work surface and tip the dough out onto it.
- Gently shape the dough into a log and cut off 12 even portions.
- Lightly grease a baking tray (I use a non-stick spray)
- Roll each portion into a ball and place it onto the baking tray, allowing for 1 or 2 inches between each bun.
- Second rise
- Cover the tray with the tea towel or place it into a clean plastic bag and leave to rest for 1 hour. The buns should double in size and the dough should spring back if prodded lightly by a finger.
- Preheat the oven to 220°C or 430°F.
- Adding the cross
- Mix the flour and water together in a bowl to form a thick paste.
- Transfer the paste to a squirting bottle to make the crosses. You can also use a 3 mm piping bag or cut off the corner of a ziplock bag to give a tiny opening (3mm)
- Pipe or squirt the paste in a line across the buns, giving the paste enough time to settle on the buns and run down the sides… Then repeat the process at a 90-degree angle to make a cross or a “+” sign on each bun.

- Baking
- Place the tray in the middle of the oven and bake for 20 minutes or until golden brown. If they turn brown in less than 15 minutes, just turn the oven down to 180°C or 350°F and briefly open the oven door to let it cool down a bit. Cook for the remaining time.
- When the buns come out of the oven, they should have increased in size again, the cross should be hard but the buns tend to look disappointing, a bit dry even but when you feel them (caution, hot), the crust is soft and yielding. This is all perfectly fine.
- Adding the glaze
- Place the apricot jam and the marmalade in a bowl and add 2 tbsp of hot water. Mix quickly to create a thick glaze.
- Use a paintbrush (or similar tool) to paint the glaze on top of each hot cross bun, making sure to reach down the sides as far as possible.
- Now they look right… transfer to a wire rack to cool.
- Remember to enjoy them!
- Serve slightly warm with softened butter to spread and a great tea.


Notes
- Yeast – use good quality instant dried yeast and always allow it to bloom in warm water with a little sugar added in. I once had a bad batch of yeast and once the buns have been rising for an hour, it is a bit late to realize that nothing will work due to the yeast… The yeast should develop a head of foam.
- Water and milk warmth – boiling hot liquids will kill the yeast. Always check with your finger. The liquid should not feel hot to you, maybe slightly warm.
- Flour – bread flour or strong flour would work better for this recipe, but can be hard to find or more expensive. Regular flour or cake flour will work as well, as long as you have about 11% (11g/100g) of protein.
- Flour/water ratio – this is hard as the exact quantities change with the weather and the time of the year. The best is to add most of the flour, keeping a couple of tablespoons spare, and most of the water, keeping about 1/4 spare. Then adjust the flour or water until you have a dough of the right consistency. Too much flour will make the buns dense and heavy. Not enough and they will not hold their shape.
- Spices – nutmeg adds a little kick and warmth. Cinnamon is traditional. Allspice adds extra depth and a hint of cloves, always popular with orange.
- Glaze – The glaze is critical for an appetizing product. At the same time, a properly glazed hot cross bun will taste sweet, and leave a slightly sticky residue on your fingers, which is perfect for a lingering aftertaste. If catering mainly to children, stick with the apricot jam while adults will appreciate the marmalade bitterness.
- Prep ahead – If you want to have these ready early in the morning, simply follow all the steps up to the 2nd rise. Once you have shaped the buns and placed them on the tray, simply place the covered tray in your fridge and allow them to rise overnight. Take a picture though as the next morning you should be able to see that the buns have grown. Take out of the fridge while the oven preheats and carry on as normal. If the buns did not double in size, then wait an hour before placing them in the oven.
- Best served fresh – hot cross buns are best eaten the day they are made. If you want to eat them the next day, simply place them in an air fryer with damp kitchen paper on top and reheat for 2 minutes at 120°C or 250°F. Alternatively, warm in a microwave for 15 seconds.
- Freezer – these hot cross buns can be frozen. Just allow to defrost on the countertop and reheat as above or place on a tray, covered in aluminum foil, and pop in a 160°C / 320°F oven for about 8 minutes.