

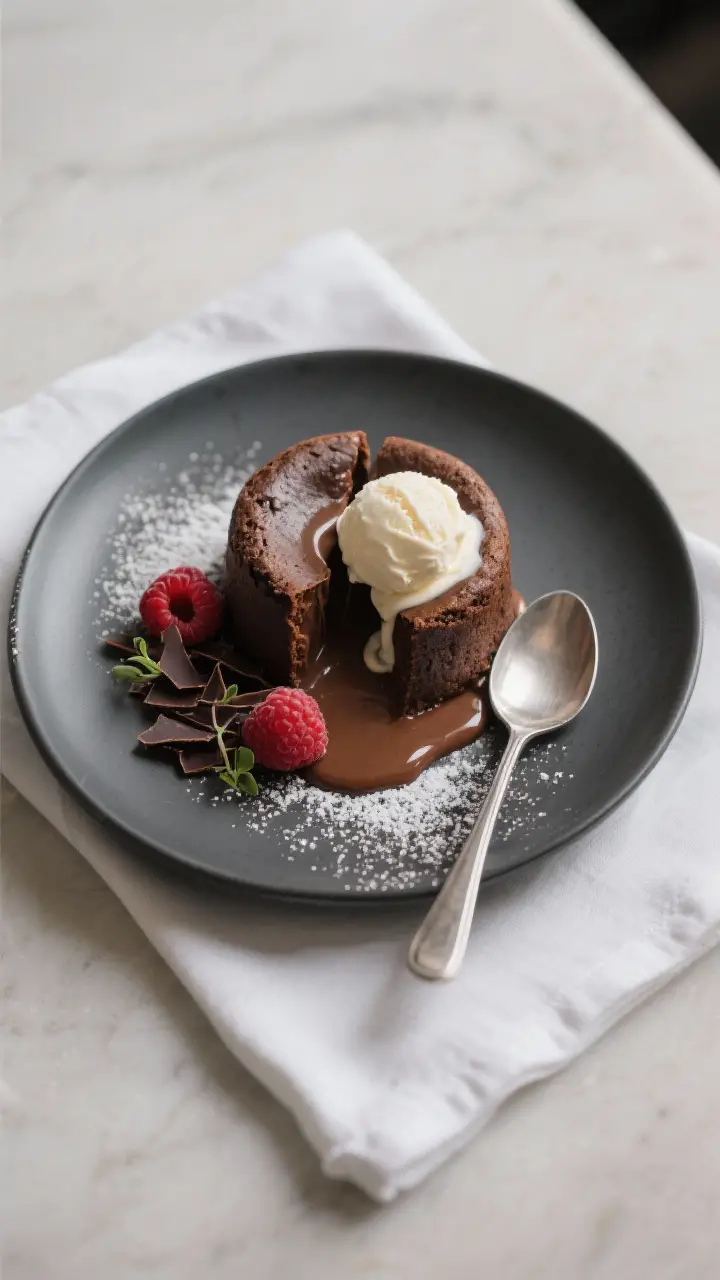
Few desserts feel as special as a warm chocolate lava cake with a molten center. Break into the cake and the rich chocolate flows out like a sauce—simple, dramatic, and pure comfort. You don’t need a fancy setup to make it at home, just basic baking tools and good chocolate.
The batter comes together in minutes, and the bake time is short. Whether it’s a date-night dessert or a last-minute treat, this one delivers every time.
What Makes This Special

This lava cake hits that sweet spot between cake and fudge. The edges are tender and slightly cakey, while the center stays soft and molten.
It’s made with pantry staples, and the portions are naturally sized for individual servings. You can bake them ahead, chill the batter, and pop them in the oven just before serving. Best of all, it’s easy to customize with flavors like espresso, orange zest, or a hint of sea salt.
What You’ll Need
- 4 ounces (115 g) semi-sweet or dark chocolate (60–70% cocoa works best)
- 1/2 cup (115 g) unsalted butter, plus extra for greasing
- 2 large eggs
- 2 large egg yolks
- 1/2 cup (100 g) granulated sugar
- 1 teaspoon vanilla extract
- 1/4 teaspoon fine sea salt
- 1/4 cup (30 g) all-purpose flour
- 1 tablespoon cocoa powder (for dusting ramekins)
- Optional toppings: powdered sugar, vanilla ice cream, lightly sweetened whipped cream, fresh raspberries, flaky sea salt
Equipment: 4 oven-safe ramekins (6-ounce size), small saucepan or microwave-safe bowl, whisk, mixing bowl, spatula, baking sheet.
Step-by-Step Instructions
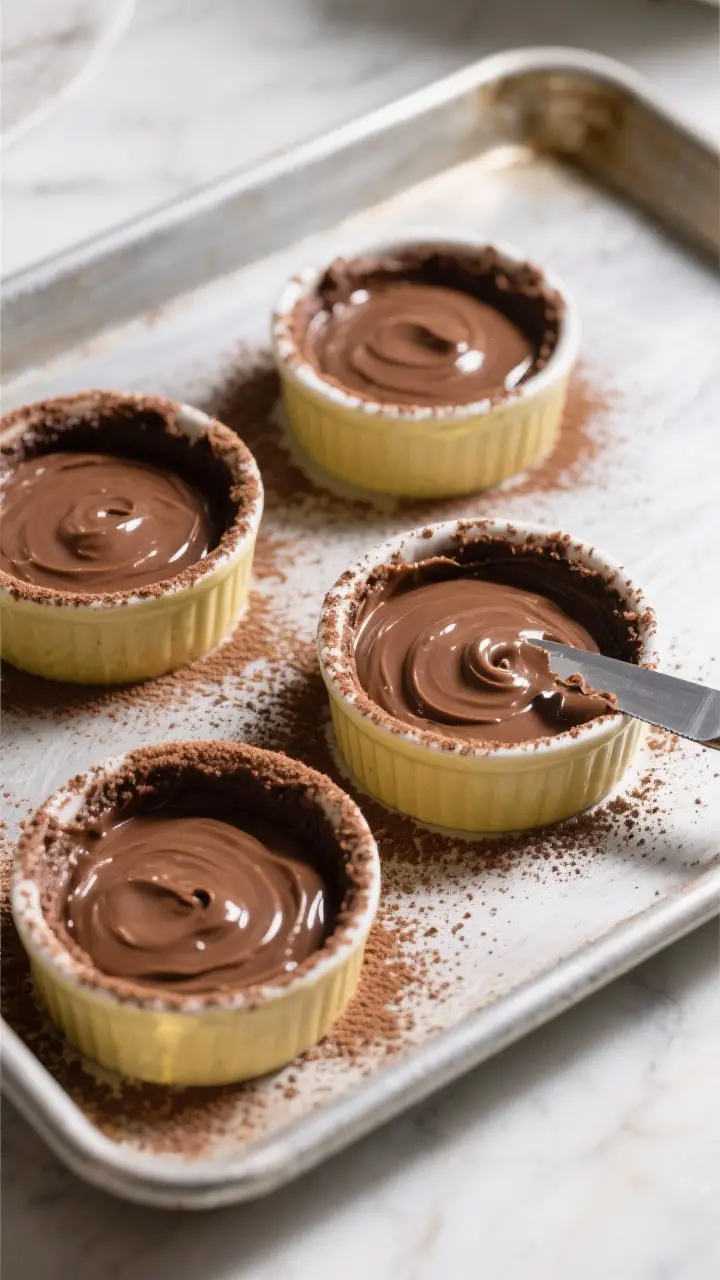
- Prep the ramekins. Heat the oven to 425°F (220°C).
Generously butter four 6-ounce ramekins, then dust with cocoa powder, tapping out the excess. Proper greasing prevents sticking and helps the cakes release cleanly.
- Melt chocolate and butter. In a heatproof bowl, melt the chocolate and butter together over a pot of simmering water, or use short bursts in the microwave, stirring often. Mix until smooth and glossy. Set aside to cool for 2–3 minutes so it doesn’t scramble the eggs.
- Whisk eggs and sugar. In a separate bowl, whisk the eggs, egg yolks, and sugar until slightly thickened and lighter in color, about 1 minute.
Add vanilla and salt. The mixture should look a bit creamy, which helps with structure.
- Combine mixtures. Slowly pour the warm chocolate mixture into the egg mixture while whisking. This tempers the eggs and creates a silky batter.
Avoid adding it all at once if it’s very hot.
- Add flour. Sift in the flour and fold with a spatula just until no dry spots remain. Do not overmix—you want a tender texture.
- Fill the ramekins. Divide the batter evenly between the prepared ramekins. Place them on a baking sheet for easy handling.
- Bake. Bake for 10–12 minutes, depending on your oven and ramekin size. The tops should be set and slightly puffed, with a soft center that jiggles a bit when you nudge the ramekin. Err on the side of underbaking for a molten core.
- Rest briefly. Let the cakes rest for 1 minute.
Run a thin knife around the edges to loosen.
- Invert and serve. Place a plate over each ramekin, flip, and gently lift it off. Dust with powdered sugar, add a scoop of ice cream or a dollop of whipped cream, and serve immediately while the centers are molten.
Storage Instructions
These cakes are best enjoyed fresh. If you must store them, keep unbaked, filled ramekins covered in the refrigerator for up to 24 hours.
Bake straight from the fridge and add 1–2 minutes to the bake time. Baked cakes with molten centers don’t store well because the center sets as they cool. If you have leftovers, reheat gently in the microwave for 10–15 seconds, but the texture won’t be the same.
Benefits of This Recipe
- Fast and impressive: From start to finish, you can serve dessert in about 20 minutes.
- Small-batch friendly: Individual servings are built in, and you can scale up easily.
- Flexible flavors: Add espresso powder, orange zest, or liqueurs like Grand Marnier for a twist.
- Minimal equipment: Just ramekins, a whisk, and a bowl.
No mixer required.
- Restaurant feel at home: Warm, melty center with a polished finish and simple garnishes.
Common Mistakes to Avoid
- Overbaking: The top should look set, but the center should still feel soft. Overbaking turns the center cakey instead of molten.
- Skipping the cocoa-dusted ramekins: Butter alone can cause sticking. Cocoa adds insurance and blends with the chocolate color.
- Using low-quality chocolate: The flavor depends on the chocolate.
Choose a bar you enjoy eating on its own.
- Pouring hot chocolate into eggs: If the chocolate is too hot, it can curdle the eggs. Let it cool slightly and pour slowly while whisking.
- Overmixing after adding flour: This toughens the cake. Fold gently until just combined.
Alternatives
- Flourless version: Skip the flour and add 1 tablespoon cocoa powder to the batter.
The texture will be fudgier and slightly denser.
- Gluten-free: Replace the flour with a 1:1 gluten-free blend or almond flour. Bake times may vary by 1 minute.
- Dairy-free: Use a dairy-free butter alternative and dairy-free dark chocolate. Check labels for milk solids.
- Stuffed center: Place a chilled square of chocolate-hazelnut spread or caramel in the middle of each ramekin before baking for an extra-gooey core.
- Flavor boosters: Add 1 teaspoon espresso powder, a pinch of cinnamon, or 1 teaspoon orange zest to the batter.
Finish with flaky sea salt for contrast.
FAQ
Can I use chocolate chips instead of chocolate bars?
You can, but results vary. Chocolate chips often contain stabilizers that affect melting and texture. For the best flavor and molten center, use a good-quality bar chocolate in the 60–70% range.
How do I know when the cakes are done?
Look for set edges and tops with a slight jiggle in the center.
A toothpick test isn’t helpful here because you want the middle to remain gooey. Start checking at 10 minutes and pull them as soon as the top is no longer shiny.
What if I don’t have ramekins?
Use a well-greased muffin tin and fill the cups to the top. Bake for 7–9 minutes, watching closely.
Invert carefully—muffin cakes are more delicate and can crack easily.
Can I make the batter ahead?
Yes. Fill the prepared ramekins, cover, and refrigerate for up to 24 hours. Bake straight from the fridge, adding 1–2 minutes to the bake time.
The texture remains excellent and the center stays molten if you don’t overbake.
Why did my cakes stick to the ramekins?
They likely needed more butter and cocoa dusting, or they were under-rested before unmolding. Thoroughly grease, dust with cocoa, and run a thin knife around the edge after a 1-minute rest before inverting.
Can I reduce the sugar?
Yes, reduce by up to 2 tablespoons without major impact. Keep in mind sugar affects texture and moisture, so larger reductions can make the cakes less tender and more prone to overbaking.
Is it safe to eat a molten center?
The center is underbaked by design.
Use fresh, high-quality eggs and bake until the edges and top set. If you prefer fully baked, add 2–3 minutes to the bake time; you’ll get a soft, fudgy cake rather than a flowy center.
In Conclusion
Chocolate lava cake with a molten center is a dessert that looks luxurious but is surprisingly straightforward. With good chocolate, careful greasing, and a close eye on the clock, you’ll get that perfect flow every time.
Serve it warm with ice cream or berries, and enjoy a restaurant-worthy treat at home without fuss. Simple steps, big payoff—exactly what a great dessert should be.